

Space. The final frontier. Those famous words from the beginning of Star Trek still echo in my head after years of watching Kirk battle cheesy-looking aliens. And for my little beach shack, space really is the final frontier–and that space is at a premium!
I moved into the Big Blue Beach Bungalow nearly 1-1/2 years ago, and at long last (and with thanks to IKEA), I’m nearly finished furnishing the place. My main living area is a long, narrow room that serves a dual purpose. It’s my primary lounging about area, with all my media, the flat-screen, blu-ray player, Xbox, etc. But it’s also a workspace, with my computer and all the accoutraments.
For a long time, I put up with a cheap $19 ready-to-assemble desk from Walmart. This humble little desk wasn’t much to look at, but sufficed as a short term solution while I completed my vision for the room.
My vision? 12 linear feet of IKEA BESTA storage in black-brown finish. Three units side-by-side, with each unit progressively taller. When I originally moved in, I already had one of the three units (my flatscreen sat atop it). And this month, the collection was completed.
The Problem
There was, however, one small problem. My original vision called for replacing the cheap desk and putting my Mac Mini in the BESTA unit, and my keyboard and mouse (both wireless) on an INREDA pull-out frame with the shelf insert option. The INREDA pull-out frame could be fitted with one of three available options: a compartmentalized tray; a hanging file system; or a shelf insert. The shelf insert works perfectly for a laptop or small keyboard and mouse.
Unfortunately, IKEA discontinued the shelf insert in 2010.
Bummer.
I tried a couple stores for stock to no avail. I checked Craigslist, again with no luck. I even tried the IKEAfans Forum, again with no success. “Screw it,” I thought. I’m fairly handy. I’ll build my own.
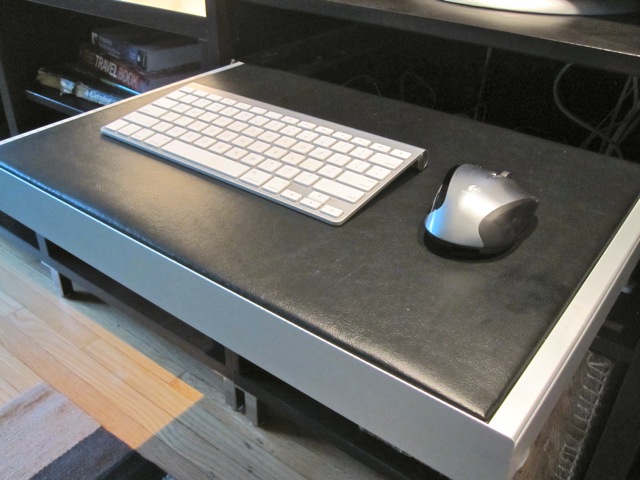
My Solution: The Do-It-Yourself INREDA Shelf Insert

The first step was assembling and installing the INREDA pull-out frame. This is easy enough for anyone with a screwdriver and the ability to follow directions.
Next, I carefully measured the opening for the insert. As it turns out, 1/2″ thick plywood is the perfect height for the insert, with dimensions of 19-3/8″ x 13-7/8″. First stop, Lowe’s. I found a 2′ x 2′ x 1/2″ sheet of sanded pine plywood, which the staff at Lowe’s were happy to cut to size for me.
Now all I needed to do was cover it. The original IKEA part was available in either white or black faux leather, and I wanted to do something similar in either black or very dark brown. The friendly people at the neighborhood Denault’s Hardware sent me down the road to Foam n’ Fabrics, where the owner gave me–for free–a remnant of black vinyl that fit perfectly.
I borrowed my neighbor’s staple gun, wrapped the vinyl around the plywood and stapled it to the underside.


It fits snugly in the pull-out frame opening, and looks perfect. Total cost? About $6 bucks (and a little bit of elbow grease).


